
Case 1 - Class 1: Upper Spacing, mild lower crowding. Fixed Appliance Plan: Non-Extraction
In this video you'll see a full case walkthrough showing my typical approach to a class 1 incisor case with a step-by step breakdown of every decision; below you'll find a brief summary of the case.
CASE SUMMARY
Diagnosis / Problems List
- High smile line
- Incisor C1
- Mild lower crowding
- Centreline shift - lower (R)
- Canines: ¼- ½ C2
- Upright incisors
- Blanching frenum
- Upper spacing
Mechanics + Appliances
- Upper and lower fixed appliances
- Standard class 1 incisor mechanics
- Class 2 canine mechanics
- Buccal crossbite mechanics
Treatment Plan Summary
- Upper and lower fixed appliance
- Re-assess for interproximal reduction (IPR)
- Retain
Archwire Sequence
- 014N / 014N
- 18x25N / 018S
- Powerchain U2-2
- 19x25S / 018S
- Powerchain U+L 6-6
- C2 elastics
- Anterior cross elastic if required
- 018S / 018S
- Powerchain U+L 6-6
- Zigzag settling elastics
- Anterior cross elastic if required
- Debond + Retain
Dr Ib Rominiyi | Orthodontic Specialist & Mentor
Explore all cases in the Ortho Playbook Library
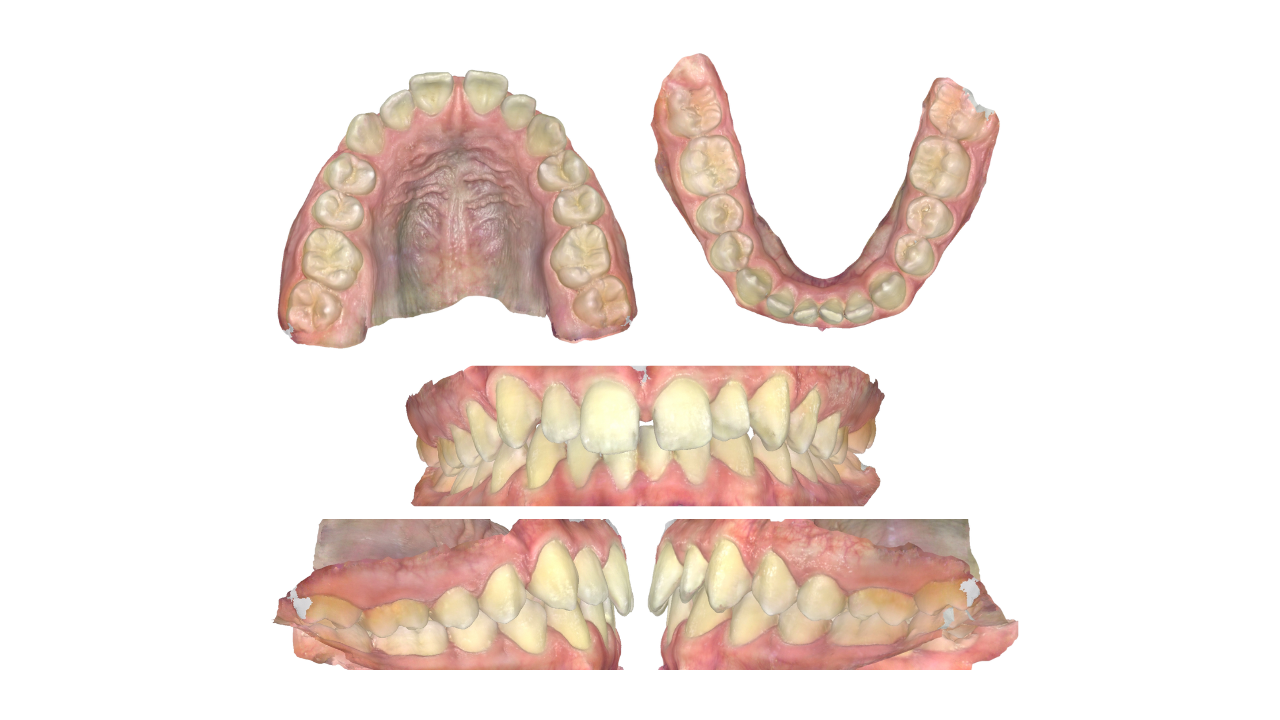
So welcome back to the ortho playbook, let's get into this case. So this case is a class one case with spacing and mild crowding and there's just one treatment plan which is my basic standard class one or class two ortho plan. So this patient, they were complaining of gaps in the front teeth and lower crowding. They were fourteen years old, medically fit and well, no trauma or habits. Extraorally they were class one and everything else was average apart from the fact that they had a high smile line. Intraoral assessment, oral hygiene was fair, a little bit of room for improvement in that lower labial segment. In the upper arch they had upper seven to seven present and the upper arch is spaced. In the lower arch they've got seven to seven present with mild crowding. The incisor classification is just about class one with that lower incisor resting on the cingulum platter of the upper incisor. The overjet is average, the overbite is average as well. The upper centreline was correct and it was actually the lower that was slightly to the right by about a millimetre with the upper one being in the middle of that diastema. So the canine relationship on the right hand side is about a half class two and the molar is a class one. Then on the left hand side the canine is more like a quarter class two and the molar again is a class one. So there were no crossbites in this case, no displacement and the incisors both a little bit upright compared to the maxillary and mandibular plane. The occlusal plane is relatively flat, there's just a normal curve of spey that you would expect. The main upper features is just the midline diastema and blanching frenum. So this frenum that they've got here, when you pull it, the palatal aspect blanches and that's a sign that the tissue runs all the way through to the palate. So the problem list, I just use my standard problem list template to make sure that I don't miss anything when I'm diagnosing this patient. A problem is this is a diagnosis. For this patient they've got a high smile line, they've got class one incisors, upper spacing, mild lower crowding, a centreline shift to the lower is to the right by a millimetre. The canines are between a quarter and a half class two. The incisors are upright and there's a blanching frenum. So the OPT for this patient was clear, there was no pathology, all teeth present, they had their wisdom teeth. Normal root morphology and length and bone levels. It was all fine. So the treatment, now this is my standard template and this identifies the treatment aims that I have for an ideal result, an ideal occlusion. I just want to achieve excellent oral hygiene, relieve any crowding, level and align the arches. I want to maintain an average overbite and I want to achieve class one canines. I wanna maintain the full unit molars to a class one, and I wanna maintain the class one incisors with an average overjet and just correct that incisor inclination slightly. I wanna achieve coincident centerline, just make sure my centerlines are matching up, and I wanna maintain coordinated arches, just make sure that I don't have any crossbites. I'll close any residual spacing, do finishing and detailing, and then finally retain all of the changes. So now ortho gearbox. So this is the simple framework that I use to hack orthodontic decision making. It's the questions that I ask to get the mechanics that I need to build a plan that I can trust. So for this case, what am I gonna do to relieve the crowding? Now I don't think I need any extraction, so it's gonna be non extraction methods. In the lower arch, I think just standard arch wire alignment is going to create a little bit of expansion and arch lengthening that will be sufficient. If I needed some IPR that would be fine, but I don't really think that we need it in this case. Next, what am I going to do to level and align the arches? So I'm going to use my standard arch wires, which we'll go through in the plan. And I just like to start off with an o one four night eye. So what am I gonna do to maintain an average overbank? Now I expect that to stay the same during treatment, I'll just keep it under review just with my normal archwire sequence. What am I gonna do to achieve class one canines? Now I wanna achieve class one canines, but I will accept a slight class two canine relationship, which we'll go into when we get to the incisors as to why. To try and achieve class one, I'm gonna use my standard class two canine mechanics. So that's gonna be class two elastic from the upper three to the lower six just to retract the upper arch back and the lower forwards. I'll do power chain upper six to three to retract the canine's back where there's space, mainly on this right hand side. And I'll reassess for IPR, which would be distal to the upper three to help retract the canines and mesial to the lower three to help bring these canines forwards to achieve a class one canine relationship. Remember, the reason why we want class one canine relationship is because it makes it so much easier to get class one incisors and full unit molars, which we already have, which is great. Now for the molars, what am I gonna do to achieve full unit molars? Now I'm aiming for class ones and I expect that to stay the same, so I'll just keep that under review. I don't think I need any special mechanics. And what am I going to do to achieve class one incisors? I would expect to maintain a class one finish, So I'm gonna just use my standard class one incisor mechanics. So I'm gonna work to upper and lower nineteen twenty five stainless steel arch wires, and I would run power chain six to six to retract the incisors back if there's any space. I would reassess for IPR. In this case, we might need it in the lower, and I would use class two or class three incisors if required because the objective is to maintain this positive overjet. Now for this case, which is slightly different from a typical case, is that I think that these incisors are a little bit narrow. So I think there's a Bolton's discrepancy. And so I believe that once we get these canines to class one, we've already got space in the upper. So if we trap these canines back, we're gonna have a bit more space in the upper, and we're already class one incisors. So if I retract the incisors back and close all the spaces, you've got the risk of a class three inside relationship and up to edge to edge bite or a reverse overjet. So that's one of the reasons why you'd wanna consider IPR in the lower arch anterior to these canines. And this is the other reason why I might accept class two canines. Remember, we don't want class one canine just for the sake of it. Obviously, it's nice. But the main reason we wanna get class one canines because they're the cornerstone of every case, it helps us achieve class one incisors. If having class one canines is not helping achieve class one incisors, I'm happy to let the canines come a bit further forwards just to maintain the positive overjet. The alternative is that get the class one and canines, and we wanna get everything perfect, And we just leave and accept the spacing anterior to these incisors, you build them up with composite or veneers or whatever. Just restorative management of those spaces so that they are their, appropriate size, and the patient might want that as part of a smile makeover. So those are the options. Next, what am I gonna do to achieve coordinated center lines? Now we've got space to correct the center line, so I think that should be fine, but I would just do an anterior cross elastic and some IPR, which you can do asymmetrically if you wanted. So let's say if we need this lower inside this lower centerline to come to the left, you can do your IPR on this side and the lower left quadrant so that the centerline can go to the left. And then for the crossbite, I expect this to stay the same. I don't expect any crossbite to develop, so I'll just keep that under review. And then in terms of finishing and detailing, this is my standard approach for most cases. I like to finish on upper and lower o one eight stainless steel arch wires, especially if I've got any, lateral open bites that are not quite biting together because it makes everything fit together nicely. I'll do any repositioning or finishing to make sure that brackets are in the right place and the teeth are all nicely aligned. And I'd run power chain six to six if there's any space, especially in the upper arch because I know that we would need it. And then settling zigzag elastics, which we'll show you when we go through the plan, just to get a really, really good bite. And then again an anterior cross elastic if I needed just to get that center line to match up or to maintain it. And then pathology or miscellaneous. So I think this is where I'd put my phrenectomy. Because of that phrenum, I would recommend a phrenotomy for this case mainly because it's blanching when you're pulling on it so I know the tissue runs through. The relapse rate of a midline diastema is high anyway. I think it's even higher with an attached frenum, so I would remove it. Whether you do it before treatment or after treatment, there's some debate, but I would ideally have that removed to the patient's willing. And then I would retain it. So I would just use normal vacuum formed retainers, upper and lower, the SH retainers, plus or minus a bonded retainer. Now in this case, I would especially want a bonded retainer in the upper arch because of this diastema just because of a high relapse rate. But it would own I would only give it if they've had really good oral hygiene throughout treatment because there are risks associated with it, especially with poor oral hygiene. Okay. So let's look at the treatment plan. So treatment options. Number one is always leave and monitor. We always offer that. You don't have to have treatment. And then number two is upper and lower fixed appliances. That's what FA is, fixed appliances. And then reassess for IPR or extraction. I don't think we would need any extractions, and then just retain. And the risk would just be your standard risks. You know, risks of demineralisation, of root resorption, of relapse, of discomfort. Just your standard risks of orthodontic treatment. So let's get into the plan. So to start off with, I always like to start off usually with o one four night eyes. And I would bond all the teeth, and I would put PBBs posterior bite blocks or bite raising modules if required. So if you bond up the brackets in the middle of the clinical crown and the patient is actually biting on the brackets then I would pop them open with just some little GIC or composite on the occlusal of the sixes, just so that they don't bite off those brackets. Or you can get bite raising modules, which have got, like, a little cushion that sits on the incisal surface of the bracket. It's just to try and prevent debond. And I will tie that in tightly and I would retie until the arch wires are passive. Sometimes I would do an intermediary wire like an o one six night tie if you've retied it for a couple of visits just to move it along. But normally, I just jump straight into the next wire which is gonna be up and there were eighteen twenty five night ties, rectangular night tie wires. And if there's any space opportunity, I would do power chain, which we definitely need in this case. And then I would move up to my stainless steel arch wires. These are like my working arch wires. Up and there were nineteen twenty five stainless steel arch wires. The main objective here is I'm trying to correct the overbuy and get the canine to class one. But remember, I'm happy to accept a slight class two just to make sure I keep a positive overjet. So for this stage, I'm gonna do power chain upper six to three just to retract these canines back, as there's a little bit of space. Keep the power chain up at two to two, and I'd run power chain lower three to three. I'd expect a little bit of space to open up here. Now doing that is gonna bring the lower canines forwards, the upper canines back, helping to get this to a class one canine relationship. And I'll do class two elastics, which is again gonna help get the canines to class class one, but it's also gonna help maintain the overbite as well. So I would do this, but I would ask the patient to stop if they start biting edge to edge. That means the overjet is overcorrected. So I'm gonna stop the elastics and check that every day. And at this time, I would do an anterior cross elastic as well, just to help maintain or correct that center line, if that hasn't corrected just with the power chain. And I'll just reassess for IPR. I don't think we would need it in this case, but this is the appropriate time to check. Now if you've got a case very similar to this, and the overbite is corrected, the k nine's already class one, you can just skip this step and just go straight to the next step, which is the same arch wires, your working arch wires, but you just run power chain sixty six. And what this is doing is now just retracting these incisors back to meet your canines, back to class one. I would still keep my class two elastics. If I'm retracting the incisors, I like to extend it to the lateral incisor, but it doesn't matter. You can just keep it on the hook on the canine, and down to the molar just to have that class two force, but again, tell the patient to stop if they start biting edge to edge and the overjet's overcorrected. I'll keep the anterior cross elastic until the centerline is corrected, And I'll just have it just at nighttime to maintain it once it has corrected. And then I would reassess for IPR again. And then I'll just finish him. So I would finish on upper and lower o one eight stainless steel arch wires. Do any finishing bends or repositioning as required. Run the power chain six to six to keep the spaces closed, and I'll do settling zigzag elastic. This is just how you get a really, really good finish where the teeth are biting together really nicely. And I would keep that anterior cross elastic if required and again probably drop down to night times only. You might be able to stop by now. And then debond and give the retainers plus or minus the frenectomy. And that's how I would manage this case. Speaker 1: ... Speaker 2: ...Click to read the full transcript